
Seeds can be started outside. If you would like to start seeds and grow your own food, but do not have any space indoors, start the seeds outdoors.
Seeds can be started outside in a mini greenhouse, low tunnels, cold frames, or transparent totes. Sow the seeds in the seed trays and place them in a mini greenhouse, low tunnel, cold frame, or totes. If you prefer to start the seeds directly in the ground, you can start them in low tunnels or cold frames. If sowing directly in the ground ensure the soil has warmed up before sowing. Start the seeds outdoors when the daily temperatures are above 50F and night temperatures are about 40F.
The seeds can be started outdoors when the daily temperatures are above 50F. Depending on your hardiness zone, the seeds can be started in spring. Watch your daily temperatures and when they reach 50F during the day, it is time to start your seeds outdoors.
Both, the cool-weather and warm-weather corps can be started at the same time because the seeds outside take more time to germinate.
When the night temperatures are below 50F bring the seeds and the seedling indoors for the night. I you have no indoor space available, bring the seed trays into the garage, shed, cold frame, or greenhouse. Basically, make sure the seedlings are kept at 50F at least. If the temperature is lower than 50F the seeds and the seedlings will survive, especially the cool-hardy ones will do just fine. But the warm-weather seedlings might get stressed, therefore bring them in for the night if you can.
How to start seeds in clear plastic totes
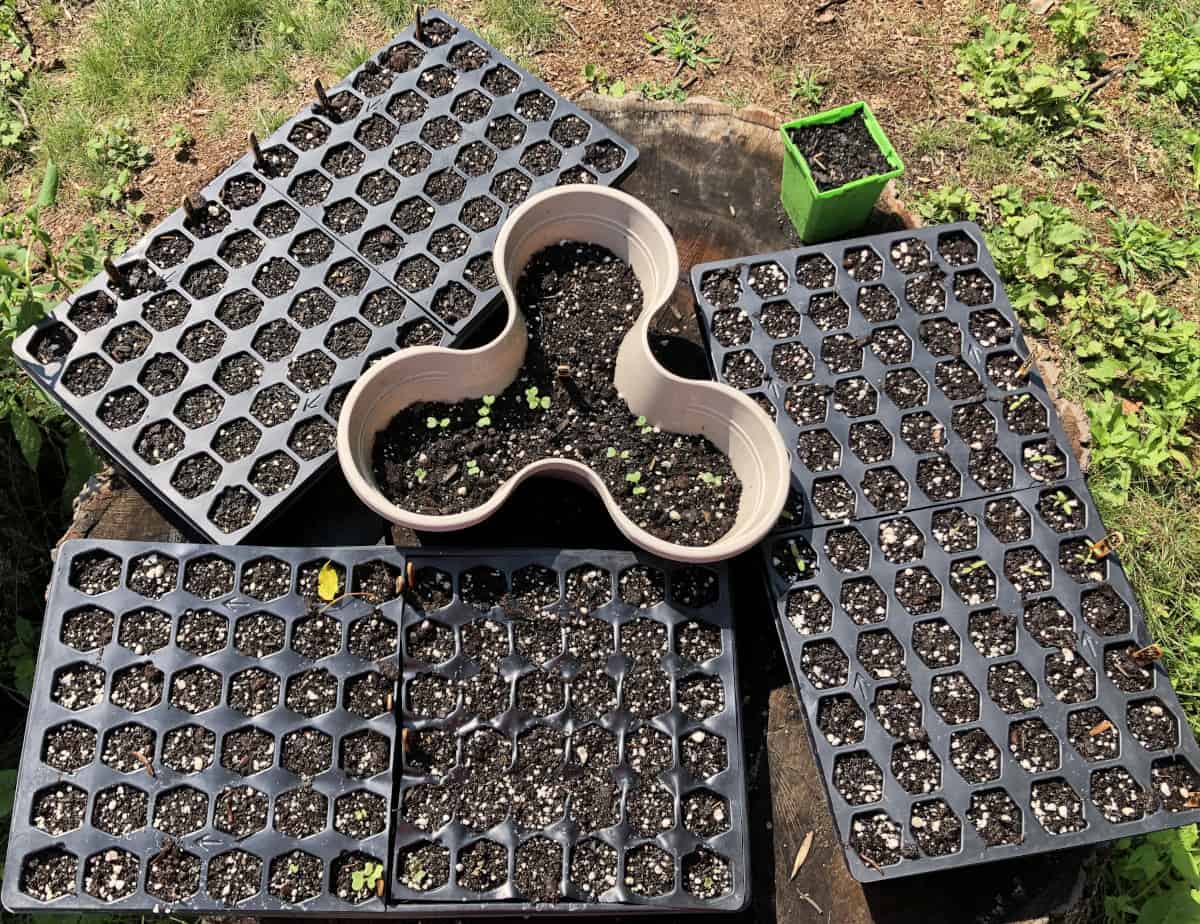
The timing of starting the seeds outdoors is different than starting the seeds outdoors. The seeds indoors can be started even 10-12 weeks before the last frost, and once the seedlings are established, they can be planted outdoors even before the last frost, this goes for the cool-hardy crops. Because the seeds need warmth, oxygen, and moisture to germinate, the seeds can be started outdoors when the weather is warmer, at about 50F during the day. Fill the seed trays with the potting mix and sow the seeds of your choice. Moisten the soil thoroughly. Plant the seeds according to the instructions on the packaging and cover them with soil. Tamp the surface of the soil to firm lightly. Moisten using a spray water bottle or a very gentle flow. Then place the seed trays in the transparent tote, and place the tote outside, and cover it with the lid. The lid is to warm up the soil and trap the moisture inside. Once you see the moisture buildup, open the lid and let the airflow in. The lid can be on top of the tote with a slight opening for air circulation.
I would recommend bringing the totes with the seed trays indoors for the night when the temperatures fall below 40F, so the soil stays warm at all times, which will speed up the germination process.
Once you see the seeds germinated, open the lid and let the airflow in circulated and provide ample sunlight to the seedlings. The more sun exposure the better and stronger the seedlings get.
If the light is limited or insufficient the seedlings will get leggy or stretched. Their stem will be prolonged, spindly, and thin. When the seedlings are leggy, it means they did not get sufficient light and were stretching for the light. Ensure each day the seedlings have plenty of bright, light.
Keep the soil moist at all times and do not let it dry out. Use the mist to moisten the soil. If the soil is left to dry out it can stress germinating seeds, or they can dry out completely and die. Ensure the soil is moist during the whole germinating process. Water the seeds once a day or as needed. If the lid is kept on the tote, your germinating seeds will not need watering until the lid is taken off.
Once the seeds germinated, and the little seedlings start to grow, they use much water to stay hydrated and to grow roots. Watering might need to be increased to twice a day.
If there is a danger of rain, put the tote with the seed, or seedlings out of the rain. Keep them sheltered. The tote might get flooded and your seeds/seedlings drowned.
Protect the tender seedlings from frost as well. If there is a danger of frost, place the seedlings inside for protection until they are well established. Once they have 2 sets of true leaves, the seedlings of cool-weather crops might withstand light frost.
Always protect warm-season seedlings from frost. They are very tender and frost-sensitive. Frost would destroy them.
The seeds are sowed in the seed trays the same way, whether they are to be grown indoors or outdoors. I have written an article to walk you step-by-step through how to choose seed-starting containers, where to get the seeds, what is the best oil for the seeds, and much more. Visit How to start seeds and care for seedlings.
How to start seeds in a mini greenhouse
To start seeds in a mini greenhouse, start the seeds the same way as in the tote method. Instead of a clear plastic tote, the seed trays will be placed in a mini greenhouse. The higher the placement of the shelves in the mini greenhouse, the warmer your seeds will be as the warm air rises. I use this method a lot, in a 4-tier mini greenhouse. It is not a walk-in greenhouse; it is basically a shelf with a clear plastic cover. I use it to start my seeds in during late spring till the beginning of summer when the temperatures are favorable during day and night. I do not take these out of the greenhouse at all. I start the seeds in my mini greenhouse about 2 weeks before the last frost. Starting with the cool-season vegetables first and then after the first frost, I sow warm-weather crops.
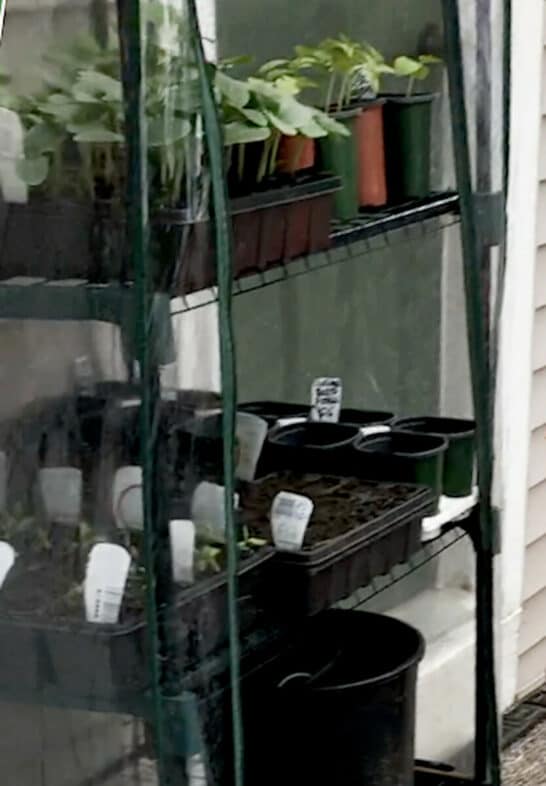
This mini greenhouse helps me to have seedlings always ready throughout the whole growing season and practice succession planting. Meaning, each time I take something out of my growing space, the new seedling fills the empty space. Thus, I can grow food the whole season long without having empty spaces in my garden.
I prefer to have extra seedlings I could sell, and a mini greenhouse is a great tool to use to grow some extra seedlings to sell. In my 4-tier mini greenhouse, I can fit 9 seed trays with 72 cells each. I do not use the bottom tray to grow seedlings because I have chipmunks and they like to climb in and destroy my seedlings. the bottom tier too. I even have to protect my seedlings and seeds from chipmunks eating them or destroying them with a tulle cover or garden mesh.
How to start seeds in a cold frame or low tunnel
Seeds can be started in a low tunnel and cold frame a few weeks before the last frost. Cover the tunnel or cold frame and let the soil warm up. Once the soil is warm enough for the seeds, plant the seeds directly in the ground. Cover the low tunnel and cold frame to keep the moisture in and cold out.
Keep in mind that the soil in an in-ground bed warms up slower than in raised beds or containers. But this can be helped in a cold frame or a low tunnel by keeping the protection cover on for a couple of days to speed up the warming-up process. Sow the seeds once the soil is thawed, workable, and warmed enough.
How do I protect my seedlings outside?
Growing seedlings outside bring some dangers since they are not grown in a controlled and protected environment. Protect sowed seeds and young seedlings from pests, frost, harsh rain, and weather elements.
How to protects seeds and seedlings from pests
Protect sowed seeds and young seedlings from garden pests by covering them with garden mesh or tulle. Tulle and garden mesh are transparent and light in weight. They do not shade the seedlings but offer protection from small pests such as squirrels, chipmunks, birds, and such.
Even though I grow my seeds in a mini greenhouse, it is not pest-proof. Many times, I found my young seedlings dug out, or chewed off by pests. Not eaten, just snipped off. That did not make me happy! Many times, I also found empty cells with the seed dug out and eaten by rodents. I use a garden mesh or tulle to protect my seedlings. This method works for me, and I can recommend it.
How to protect the seeds and seedlings from frost
If staring the seeds before the last frost date in your area, you will deal with the frost at night. The seeds sowed outdoors can be protected from the occasional frost with a frost cover. When the seeds or seedlings are in danger of frost, cover them with a fleece garden cover, fabric or plastic frost cover, newspapers, or straw, and hay can be used too. Use something light that would not damage the seedlings but would provide needed insulation from frost. If there is a danger of frost and you have warm-weather crop outside, bring them indoors, or place them where they can be protected. They will not withstand the frost.
There is a danger of frost until the last frost date in your area. If you do not know when is your frost date, use the hardiness zone map to find the date for your respective area. Visit What do hardiness zones mean and how to determine yours. In this article, I explain what hardiness zones are and how to find out your hardiness zone and determine the date of the last frost for your area.
How to protect seeds and seedlings from weather elements, rain, wind
Sometimes the seeds need to be protected from weather elements like a strong wind, harsh rain, or hailstorm. These could easily destroy the fragile seedlings, blow off or turn over the seedlings, and displace or wash out the seeds. Protect your seeds and seedlings by coverings, bringing them under shelter, building an overhead for protection using cartons, large planters turned upside down, or even mulching the top of the soil with shredded paper, hay, or straw. The best way is to bring the seeds and seedlings under shelter or indoors, but if this is not an option use the protection I described above. Ensure all the covers used to cover the seeds are encored and secured so they cannot be moved by the weather elements.
There are many vegetables that are best direct sowed and do not need to be sowed in cells or seed trays. Visit What vegetables are best direct sow? By direct sowing these vegetables you will save time and workload by sowing them directly in their permanent place.
Some gardeners have only a minimum space to start seeds. I thought of you too! Please visit How to start seeds with minimum space, here!
One other method that will allow you to start seedlings outside is by winter sowing. I talk about the winter sowing method in one of my other articles titled How to start seeds without grow lights. A winter sowing method allows you to start the seeds early with the snow still on the ground. This method is also an outdoor growing method during which the seeds sprout, grow, and mature outside during their whole life cycle. I have tried a winter sowing method, and have to say it worked for some seeds well but not for all. Some gardeners like to use this method, and some do not. I invite you to read through this article to learn more about the winter sowing method to see if this one would be just the one you are looking for to start sees outside.
You will need plant labels right from the start to label your seeds, seedlings, and each row or plot in the garden. I always make my own plant labels and never run out of them. I have shared with my viewers in a detailed photo instruct article how I make my own plant labels. Oh, and did I mention they cost me nothing? Visit How to make your own free DIY plant labels and why.
If you wish to start seeds without using grow lights, read How to start seeds without grow lights. In this article, I talk about several methods to start seeds with no grow lights.
How to start seeds and care for seedlings
What do hardiness zones mean and how to determine yours
